Smart Heating Solutions

How to Choose the Best Electric Marine Toilet

Choosing an Electric Marine Toilet involves more than comparing flush buttons or polished product photos. The right model must fit the boat’s available space, electrical system, plumbing, and expected use. A compact unit may suit a small cabin, while a larger bowl can feel more comfortable on longer trips. Measure the installation area, including room to open lids and reach service points.

Power requirements deserve close attention. Check voltage, current draw, wiring recommendations, and whether the toilet uses fresh or seawater for flushing. A pump that sounds modest in a brochure can still affect a small battery bank, especially when several people use it. Review the manufacturer’s specifications and installation guidance, and ask a qualified marine technician if the existing wiring or plumbing is uncertain. Small details matter.

Maintenance is part of the buying decision, not an afterthought. Look at how easily you can access the pump, hoses, seals, and control panel. Ask which cleaning products are recommended, and whether spare parts are readily available for your cruising area. Noise, odor control, bowl shape, and flush settings also matter in a confined cabin. No model is perfect. A feature that seems convenient at the dock may be less useful underway, so weigh comfort against serviceability and power use. This guide explains the main options and trade-offs, helping you choose with realistic expectations rather than relying on appearance alone.
How to Choose the Best Electric Marine Toilet

Map Local MSD Rules: Type III Systems Retain Sewage Onboard

Choosing an electric marine toilet begins with the waters your boat will visit. Under U.S. Coast Guard rules, a Type III marine sanitation device holds sewage onboard for later disposal. Local restrictions can differ, so check requirements for each harbor, marina, and destination before choosing a system. A compliant setup at home may not suit every planned stop.

Pumpout access matters as much as tank size. NOAA’s Clean Vessel Act program reports support for more than 5,000 pumpout and dump stations nationwide. That number does not guarantee convenient access on your route. Check station locations, operating hours, and whether your boat’s fittings are compatible. Then estimate tank capacity using crew size, trip length, and toilet use. Leave room for delays. A tank that seems ample at the dock can fill faster than expected.

An electric unit also needs reliable power, suitable wiring, and enough flush water for its design. Check the manufacturer’s electrical specifications, then consider battery capacity alongside other onboard loads. Keep the holding tank and hoses accessible for inspection and service. This part is easy to overlook. I would not choose a toilet from a brochure alone; the less glamorous details often decide whether the system works well aboard.

Match Rated Voltage to 12/24 V DC or 120/230 V AC Boat Systems

How to Choose the Best Electric Marine Toilet

Match the toilet’s rated voltage to the boat’s actual supply: 12 or 24 V DC, or 120 or 230 V AC. These options are not interchangeable. A 120-watt motor draws about 10 amps at 12 volts, but 5 amps at 24 volts, before losses. That difference affects cable sizing, fuse selection, and starting performance. Check the label and installation manual, not just the boat’s nominal system voltage. Small details matter. For AC models, confirm the specified voltage and frequency match the vessel’s supply.

Long cable runs can reduce voltage at the motor, especially in a 12 V installation. ABYC E-11 provides widely used guidance of 3% voltage drop for critical circuits and 10% for other circuits; confirm the applicable requirement for the installation. Measure voltage at the toilet while its pump runs, not only at the battery. ISO 13297:2020 covers AC and DC electrical installations on small craft, making it a useful technical reference. A survey report or standard cannot replace the toilet maker’s limits, though. I would also recheck the wiring plan after installation; that step is easy to overlook.

How to Choose the Best Electric Marine Toilet — Match Rated Voltage to 12/24 V DC or 120/230 V AC Boat Systems
Boat Electrical System Toilet Rating to Look For Typical Installation Context Key Compatibility Check Practical Selection Guidance
12 V DC 12 V DC Common in many smaller boats and in DC-powered onboard systems. Confirm the toilet is rated for 12 V DC and that its wiring, fuse, and supply can handle the manufacturer’s specified current. Choose this version when the intended supply is a 12 V DC circuit. Account for cable length and voltage drop, especially on high-current loads.
24 V DC 24 V DC Used on some larger boats and DC systems designed around a 24 V battery bank. Confirm the toilet is rated for 24 V DC. A 12 V-only model is not automatically compatible with a 24 V supply. Match the unit to the system’s nominal voltage and follow the installation manual for conductor size, overcurrent protection, and connections.
120 V AC 120 V AC May be available from shore power or an appropriately rated onboard inverter or generator. Check the toilet’s AC voltage rating and the supply configuration. Do not assume a DC model can operate from AC power. Verify that the available AC supply meets the unit’s requirements and that installation follows applicable marine electrical practices.
230 V AC 230 V AC Common in many regions and on boats configured for 230 V shore power or onboard AC generation. Confirm the model is specifically rated for 230 V AC and check any stated frequency requirements against the boat’s supply. Do not connect a 120 V-only unit to 230 V. Use a model whose rating matches the actual supply, or a properly engineered solution approved for the installation.
Voltage label says “100–240 V AC” Only if the manufacturer explicitly lists the boat’s supply voltage and frequency Some equipment is designed for a range of AC input voltages; this must be stated on its rating label or in its manual. Read the complete rating, including AC/DC type, voltage range, and frequency. A wide-range AC rating does not imply DC compatibility. Use the published rating rather than inferring compatibility from appearance, connector type, or a similar model.
Any system: current and protection Use the manufacturer’s electrical specifications Applies to DC and AC installations. Check running current, any specified starting or peak current, fuse or breaker requirements, and wire-size guidance. Do not size wiring or protection from voltage alone. Follow the installation manual and applicable marine electrical standards.

Compare Rated Liters per Flush to Estimate Holding-Tank Capacity

A marine toilet’s rated liters per flush give you a useful starting point for estimating holding-tank capacity. Check the specification for both normal and reduced flush settings; some systems use different amounts. Then multiply the liters per flush by the number of flushes you expect between pump-outs.

For example, 12 flushes at 1.5 liters each use about 18 liters, before allowing for other inputs or usable tank limits.

Plan with real onboard habits in mind. A weekend crew may flush more often than expected, especially when guests are aboard. Leave spare capacity rather than sizing the tank to match the calculation exactly.

This estimate is not exact. Flush ratings can differ from actual use, and tank shape, sensors, and installation affect how much capacity is practical. Check the toilet and tank specifications together, and confirm the tank’s usable volume with the installer. A small measuring log during a typical trip can also reveal whether your assumptions are realistic. The numbers may still be a little off.

Check 33 CFR 159 Limits: Type I ≤1,000; Type II ≤200 Fecal Coliforms/100 mL

How to Choose the Best Electric Marine Toilet

An electric flush can feel powerful, but it does not prove the sanitation system meets a treatment standard. Check the marine sanitation device classification and its verified effluent results. Under 33 CFR 159.53 and 159.55, Type I devices must keep fecal coliform bacteria at or below 1,000 per 100 mL; Type II devices must stay at or below 200. Those limits are not interchangeable.

That matters.

Ask for independent test records, not only a brochure claim. EPA’s 40 CFR 136.3 lists approved methods for analyzing wastewater bacteria, helping buyers check whether reported counts came from a recognized test method. Compare results with the applicable limit, and confirm the sample reflects the installed system, not just a laboratory bench test.

A tidy specification sheet can hide important details.

Also consider where the vessel operates, its holding capacity, and how often the toilet will be used. Treatment performance depends on correct installation and maintenance; clogged lines or neglected components can undermine expectations. I would check service access before choosing a compact unit. It is easy to overlook. Ask the seller or installer how the system is tested and maintained, then keep those records with the vessel documents.

Verify Bowl Dimensions, Pump Access, and Hose Routing Before Purchase

How to Choose the Best Electric Marine Toilet

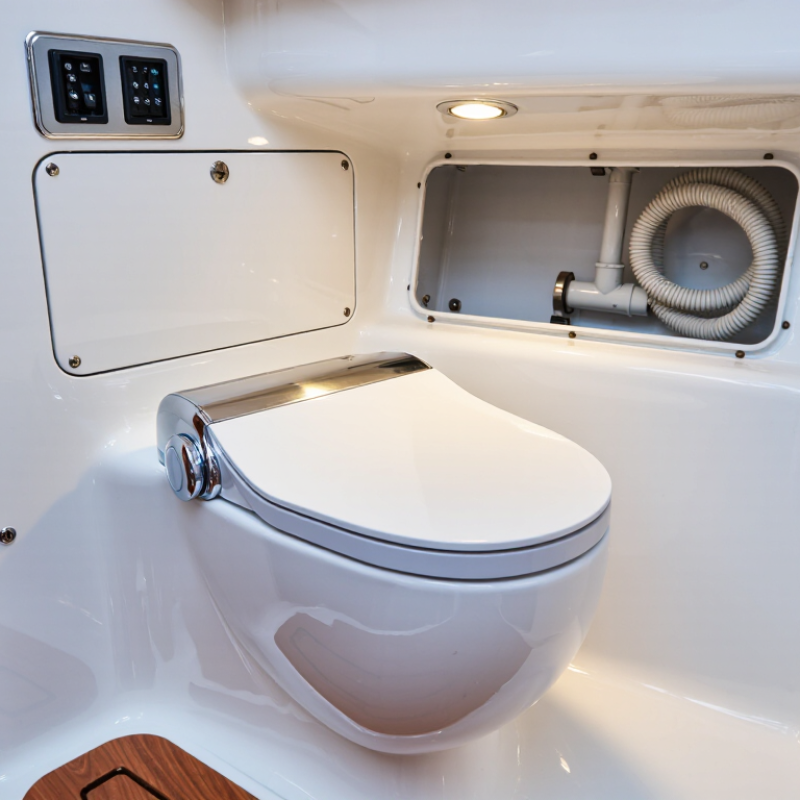
Before buying, compare the toilet’s dimensions with the space aboard your boat. Measure the mounting footprint, bowl projection, seat height, and clearance for the lid. Check whether a nearby door, cabinet, or shower partition blocks access. Measure twice. A cardboard outline can help reveal awkward corners, though it will not show every installation issue. Leave room to sit comfortably and reach the controls without twisting around nearby fixtures.

Access matters. Locate the pump and identify which panels must open for inspection or service. A compact unit may fit the compartment yet leave too little room to remove a cover or reach a hose clamp. Sketch the hose route from toilet to holding system, noting bends, rises, and obstacles. Compare hose diameter and routing requirements with the installation instructions; tight turns can complicate fitting and future maintenance. A tape measure alone can still mislead, so check the route in the actual compartment before purchase. Confirm electrical connections and service clearances as well. Small compromises can work, but only if they remain reachable when something needs attention.